HOW TO DIY INSTALL COURT SPORTS FLOORING

Sports tiles are the ideal flooring for anyone looking to install an athletic court in their yard. These tiles are easy to install, so you can create a DIY backyard court in a matter of hours. Multi-sport athletic court flooring is also durable, fade-resistant and comes in many bold colors to suit your style.
- Make sure you’re starting with a clean, dry, and level surface.
- Begin at one corner of the court, placing the first tile with the peg sides facing outward, and both looped sides facing inward.
- To connect tiles, insert the pegs into the loops of an adjacent tile, and step down on the connected edges to snap them together.
- Work your way along the perimeter, creating an L shape along two adjacent sides. Leave a 3/4” gap between the tiles and any walls or obstacles, to leave room for expansion and contraction with temperature changes.
- Once two sides of the court are completed, continue to fill in the rest of the area until it is complete.
- If you have also purchased edge pieces, now is the time to install them. To install an edge piece, simply snap the pegs into the loops of the tiles. These pieces also come with attachable loops so you can secure them to the peg edge of a tile if necessary.
Note: Even though our outdoor sports tiles are made from the same plastic as our standard garage tiles, we do not recommend daily driving of a vehicle over them. If a vehicle must drive over the court on a daily basis.
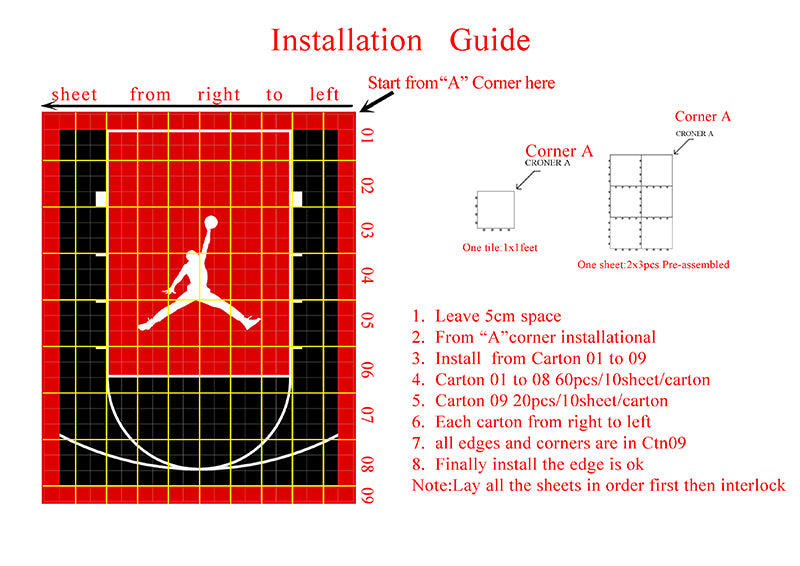
The installation guide of 20x25 feet basketball court:


